Set Up Line Printer Labels

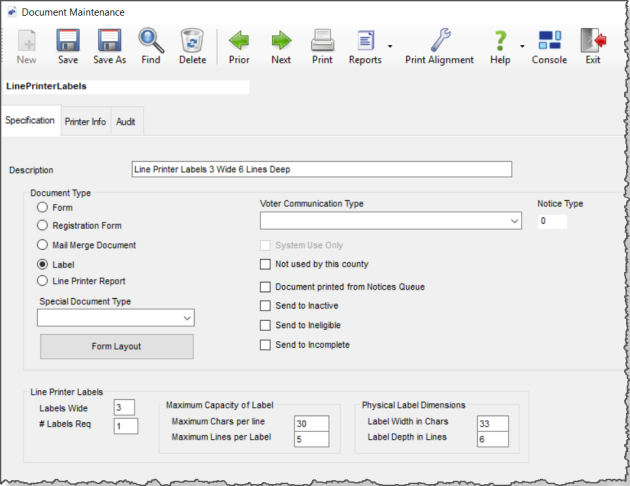
Use the Document Maintenance dialog to specify labels for any kind of label stationery that you want to use with a line printer.
In the example above, no communication type has been specified and the notice type is zero. This means that the label printing will not be added to voter records as a communication. It also means that the only way of printing these labels is through FlexRep.
In FlexRep, all that is involved is selecting an output option for Voter Focus Document and selecting the document name (in the example here the document name is Line Printer Labels 3 Wide 6 Lines Deep), specifying the selection criteria to find the voters, running the report, and printing it to a printer where label stationery is loaded.
- Go to Printing > Document Maintenance.
- On the Select Document dialog, select a document type, such as Line Printer Labels 3 Wide 6 Lines Deep. The Document Maintenance dialog displays.
- Under Document Type, select Label.
- Set the form depth to the number of lines for one label between label perforations. If the label is 1 inch between the top of the label and top of the label below it, the form depth will be 6 (assuming a 6-lines-per-inch-printer.)
- Set the number of labels wide. This could be 1, 2, 3, or 4, depending on the label stationery.
- Increase the value in # Labels Req to print more than one label per voter.
- Under Maximum Capacity of Label:
- Set the Maximum chars per line value. If the physical width is 3 inches and 30 characters, you will need to allow some margin around the edges of the label, so the maximum capacity of the label might be 28 or 29 characters.
- Set the Maximum Lines Per Label value. In the same way that a margin might reduce the printable characters on the label, you might reduce the printable lines.
- Under Physical Label Dimensions:
- Set the Label Width in Chars value. This is the number of characters that can print between the left edge of the left-most label and the left edge of the next label. You need to know the number of characters per inch that the line printer prints. Normally this would be 10 cpi. But for small format printers, it can be up to 17 characters.
- Set the Label Depth in Lines value. This is also referred to as Form Depth.
- On the Printer Info tab, set the printer options as required (you will likely leave them blank).
- You then layout the label using the Form Layout. You layout one label, setting the line number and character location on the first label. See Form Layout for Line Printers.
Below is an example of a simple layout for line printer labels:
The Printer Options field on the Printer Info tab has the following valid entries:
|
SelectPrinter |
Forces the selection of a printer at run time. This can be useful when the printer might vary from workstation to workstation, or when you wish to offer users a choice of printers for each run. |
|
BOJ=[Esc]0 |
This option is a string that is sent to the printer. The characters "[Esc] are converted to the Escape character. In this example, some printers are placed in 8 lines per inch mode (rather than the default, which is 6 lines per inch). You can enter multiple, for example: [Esc]0[Esc]M |
|
MT691 |
Enables the printing of Bar Codes on the Mannesman Tally MT691 printer using the optional graphics printing package. |
